Monday 11 November 2013

Decorate the Tree Template - Kids Crafts


Decorate the Tree Template


Decorate the Tree Template
Ages school-age

Kids will have a ball decorating this tree with their favorite Disney characters, ornaments, and any other flair they desire.

How to make it


  1. Print the tree template on regular paper or cardstock and cut out the pieces. Tape the two pieces together. You can either color in your tree or use it as a pattern to trace onto green poster board.

  2. Print the toppers and ornaments on regular paper or sticker paper. Color them in with crayons, color pencils, or markers. Choose your favorite topper and ornaments to stick on your tree.
  3. Add your own crafty flair to the tree using glitter, dry macaroni, or popcorn.

Crafter's Carousel - Kids Crafts


Crafter's Carousel


Crafter's Carousel
This photo originally appeared in FamilyFun Magazine
Total Time 1 to 2 hoursAges all-ages
This versatile rack and carrying tray can be adapted to hold drawing tools (as we show here) or other collections of craft materials (see "Customized Craft Kits" below). Set the tray on a lazy Susan and it lets all the kids at the table have access to the pens, pencils, markers, rulers and glue sticks. Each removable tub is color-coded, encouraging its eventual return.

What you'll need

  • Corrugated cardboard
  • Craft or utility knife
  • Plant pot tray (we used a 14-inch diameter model)
  • Assorted plastic juice cans, glasses and cups
  • Egg carton
  • Cardboard tubes (mailing or paper towel tubes)
  • Con-Tact paper (optional)
  • Colored tape and paints
Variations:

Drawing supplies:
pens and pencils, markers, glitter glue, oil pastels, crayons, erasers, rulers, compass

Beading kit:
beads, thread, string, jewelry fasteners and pin backs, glue, scissors

Hairstyling:
combs, barrettes, hair ties, hair sticks, bobby pins, hair mascara, hair spray

Model building:
glue, paint, craft knives, balsa wood, clamps, pins, decals 

How to make it

  1. Cut the cardboard into a circle that fits just inside the rim of the pot tray. Some trays are formed with a lip just below the rim that can support your circle. If there isn't one on your tray, create a support by forming a ring from a 1-inch-wide strip of corrugated cardboard (with the corrugations running the short way). Set it against the inside wall of the tray.


  2. Gather your art materials and match them to the most suitable containers (pencils in a tall cup, erasers in a section of egg carton and so on). Arrange the containers on the cardboard circle, placing smaller containers toward the outside and taller tubes in the center. Once you have a layout you like, trace around the containers.


  3. Cut out the traced shapes with a craft or utility knife (adults only). As you cut, keep to the outside of the traced lines so the containers will slide out easily. Tip: To strengthen our unit, we glued the three center tubes to the cardboard circle. You could also use tape. Also, we placed one of our smaller cups inside a shallow, slightly larger cup. This larger cup stays in the circle, allowing the smaller one to be removed and replaced even more easily.


  4. Cover the tubes, jars and large cardboard circle with Con-Tact paper, if you like, to make the carousel more durable.


  5. Wrap colored tape or paint a band of color around the top of each container. Paint a ring of the same color around the hole so you'll be sure to know which container goes back into which hole.

Animal Jars - Kids Crafts


Animal Jars


Animal Jars
Total Time 2 to 3 hoursAges school-age
Recycle jelly and sauce jars to hold all your little toys, item, and coins. Give your glass a new lease on life by making these adorable animal buddy jars to display in your room! Makes a fun Earth Day craft for kids that is also environmental friendly. Also check out our other animal themed crafts and visit our Earth Day homepage, which features other fun recycled crafts, recipes and fun printables.

What you'll need

  • Clean, empty glass jars
  • Felt, any color you like
  • Pom poms (for noses)
  • Scissors
  • White craft glue
  • Wiggle eyes
  • Gesso (recommended: Liquitex Basics Gesso) or white craft paint
  • Patterns
Helpful Tip:


Get creative and make whatever animals you like. Use jars from jelly, mayonnaise, pickles and other condiments. You can use hot glue for attaching the felt to the lids if you like.

How to make it

  1. Print the patterns.


  2. Remove lid from jar and paint with a layer of Gesso or white paint. Let dry. (See photo.)


  3. Line the top of the lid with glue. Pipe glue around the outside rim as well.


  4. Place lid, glue side down, onto a piece of felt. (See photo.) Wrap felt around lid and rim and hold snugly so glue can begin to grab. Sometimes felt will soak up the first layer of craft glue. If this happens, pipe more glue around the rim and repeat. (See photo.)


  5. Trim the excess felt around the edge of the rim. (See photo.)


  6. Fill the jar with whatever knick knacks, toys, or coins that you like.


  7. Return the felted lid to the jar.


  8. Cut additional animal pieces (ears, cheeks, trunks) from pattern to create animal faces. We used contrasting colors for some of our designs. For example, we used maroon for the red dog's cheeks to stand out against its red face. (See photo.) Glue these pieces on, using our finished photo as a guide on where to place them. (See photo.)


  9. If creating the cat or dog, cut out long thin strips of felt for the whiskers and glue them on top of the cheeks.


  10. Glue the facial parts in place. Use pom poms for noses. (See photo.)


  11. Glue on wiggle eyes. (See photo.)

Thursday 31 October 2013

Homemade Hobbyhorse - Kids Craft

Homemade Hobbyhorse


Homemade Hobby Horse
This photo originally appeared in FamilyFun Magazine
Total Time 1 to 2 hoursAges toddler
Ages: 2 years and up

Giddyap! Keep your little neigh-sayer horsing around for days with this soulful steed, easily assembled in about an hour from a dowel and a fuzzy slipper sock. If clippety-clopping through the house loses its spark (unlikely), let him try a horseplay scenario or two. He can jump over foam blocks in a steeplechase course or compete in a toy animal rodeo, using a yarn lasso or tongs to corral that plastic cow as he trots by.

What you'll need
  • 1 fuzzy slipper sock
  • Polyester stuffing
  • Needle and thread
  • Felt (we used off-white, yellow, and brown)
  • Hot-glue gun
  • Yarn needle and 13 yards of thick yarn
  • Thick dowel or broom handle, cut to fit your child (ours measures 2 1/2 feet)
  • 1 1/2 yards cording (we used velvet)

How to make it

  1. Loosely fill the slipper sock with polyester stuffing.
  2. Homemade Hobby Horse - Step 2


    Make the nostrils. With the heel facing up, pinch the fabric on one side of the toe and sew a 1/2-inch-wide horizontal stitch across the pinch. Knot the ends, then repeat for the other nostril.
  3. Homemade Hobby Horse - Step 3


    To make ears, cut four matching rounded triangles from felt (ours are 2 inches wide by 2 1/2 inches high). Glue them together in pairs. Slightly bend each ear to create a hollow, then sew them to the head as shown.


  4. Cut out almond-shaped eyes and pupils from felt. Sew the pieces together, then sew them onto the head.
  5. Homemade Hobby Horse - Step 5


    To make the forelock, sew a 4-inch piece of yarn through the head where shown, then knot it close to the head so it looks like fringe. Repeat, tying 10 lengths of yarn about H inch apart to the top of the head. (Tip: To avoid continuously re-threading the needle, use one 2-foot length of yarn at a time and trim it after each stitch.)


  6. To make the mane, sew and tie 35 1-foot-long pieces of yarn about 1/2 inch apart to the back of the head and neck. Taper the width of the mane into a V shape as you work your way down the sock.
  7. Homemade Hobby Horse - Step 7


    Pad the top of the dowel with a large handful of stuffing. Pull the head over the dowel and add stuffing as needed. Apply one large bead of glue to the dowel, then press the sock to the glue for 5 seconds. Pleat and glue your way around the dowel, then glue a length of cording to the dowel just below the sock.
  8. Homemade Hobbyhorse - Step 8


    To make the bridle, glue two 1-foot lengths of cording around the horse's head as shown (fold the ends under to hide the raw edges). To make the rein, drape a 21-inch length of cording around the back of the horse's head, then glue it to the sides of the bridle as shown, wrapping the ends around the cording at the nose to hide the raw edges.

Tiny Bubbles - Kids Crafts

Tiny Bubbles

Tiny Bubbles

Total Time 30 minutes or lessAges preschooler
You and your child can send clouds of tiny bubbles skyward with this quick trick.

What you'll need

  • Drinking straws
  • Tape
  • Dish-washing liquid
  • Light corn syrup (or glycerin)

How to make it

  1. Instead of a traditional bubble wand, use a number of drinking straws bound together with a few pieces of tape.


  2. Dip one end of the bundle into a shallow dish of bubble solution (you can make your own by combining 1 cup of water with 1/3 cup of Dawn or Joy dish-washing liquid and 2 tablespoons of light corn syrup or glycerin), then blow through the straws, being careful not to let the solution run down the straws to your mouth.


  3. The cluster of straws will produce scores of diminutive bubbles.

Boogie Monster - Kids Craft

Boogie Monster

                          Boogie Monsters


Ages preschooler
Total Time 1 hour

These zany desktop dancers have the "cents" to stand on their own two feet.

What you'll need

  • Tacky glue
  • 3 (12-inch) pipe cleaners
  • 2 medium pom-poms (ours were 1 1/2 inches in diameter)
  • 2 googly eyes
  • Felt
  • Tiny pom-pom
  • Wooden skewer
  • Feather
  • Poster tack
  • 2 pennies
  • 2 penny-size buttons

How to make it

  1. Glue a 7-inch length of pipe cleaner between the pom-poms for arms. Let the glue dry.


  2. For legs, fold a 9-inch pipe cleaner length in half and glue the fold to the bottom of the lower pom-pom.


  3. Attach each googly eye to a small felt circle, then glue the eyes, felt ears, and a tiny pom-pom nose to the face.


  4. For each horn, coil a 4-inch pipe cleaner length around the skewer, then glue the horn onto the head. Fold the ends of each arm to form hands. Glue the feather tail in place.
  5. Step 5 - Boogie Monsters


    Add a foot to each leg by using a small ball of poster tack to sandwich each end between a button and a penny, as shown.

Tuesday 29 October 2013

How to make a bowl out of buttons

Here’s what you’ll need:

  • Buttons
  • Glue
  • A hemispheric mold (I used a curved Tupperware lid) 
  • Release agent (I used aluminum foil)

Here’s what you’ll do:

Button bowl
Line your hemispheric mold with aluminum foil. You can use the inside or outside of your mold. I chose the inside and think that the weight of the buttons resting against each other made things easier.
Button bowl
Pour some glue onto a plate and dip the edge of your button into the glue. (I dipped them in two spots so they’d adhere to the buttons on either side of them.
Button bowl
Place your first button in the center and place remaining buttons on either side until you have completed your bowl. I completed one line at a time so that I could be sure they were straight.
Button bowl
Allow your bowl to dry completely. I left mine to dry overnight. Gently peel the aluminum foil from the bowl.

Tips for making a button bowl:

Play with different colors of buttons. Try creating fun patterns with a variety of different colors, including translucent buttons.
Try making different sizes of bowls. Small bowls are perfect for kids' rooms, larger bowls can make a gorgeous centerpiece.
Use Mod Podge to create a smooth, shiny finish.

Easy DIY throw pillow

NO-SEW DIY THAT IS CUTE AND AFFORDABLE!

Desperately need to spruce up your tired old couch but hate sewing? Before you spend a fortune on trendy new throw pillows, give this super easy DIY a try! You'll save time and money, plus, no needle and thread or sewing machine required!
pillow
This is one DIY that is completely customizable. You can create your own throw pillow cover using any color or pattern of fabric you'd like! In less than 20 minutes, you can instantly update an old couch and create throw pillows that will make your friends jealous!
Original tutorial provided by Tip Junkie.

Materials: 

  • 16 x 12-inch throw pillow
  • Your choice of fabric (needs to be double the width and height of the pillow size)
  • Scissors
  • Safety pins

Step 1: Measure fabric

pillow
Place the pillow in the middle of the fabric and make sure both sides around it are of equal length.

Step 2: Fold fabric over pillow

Beginning at the bottom, fold the fabric up to the center of the pillow. Repeat with the top half of the fabric and overlap in the center.
fold
pillow
Then, starting on the right-hand side of the pillow, fold the top half of the fabric in. Repeat with the second bottom half. You'll end up with the fabric shaped like a triangle.
fold
fold
Then, once both sides have been folded in, bring each side over the top of the pillow so it crosses over the center.

Step 3: Knot

Once both sides have been crossed over, take the ends and tie a knot right in the center. Don't worry if the pillow looks really wrinkled and messy, you can fix that once the knot has been tied.
knot
Tuck the frayed ends of the knots into one another and secure with a safety pin.
clip

Step 4: Display!

Straighten the fabric and tuck in any loose ends. Display on your couch or bed!
pillow

DIY colored pencil favor boxes

Although making things has never gone out of style for many of us, people everywhere are suddenly announcing that crafting is back. Unlike when your grandma did it, this time it's super trendy. The challenge to turn supplies into surprise has make-and-do misses and misters everywhere plugging in their glue guns!
As a judge on TLC's popular competition show Craft Wars, I have seen this enthusiasm firsthand in the eyes of each week's contestants, willing to do battle using gallons of glitter, hundreds of hoops (normally used for embroidery) and enough spray adhesive to instantly glue viewers to their seats!
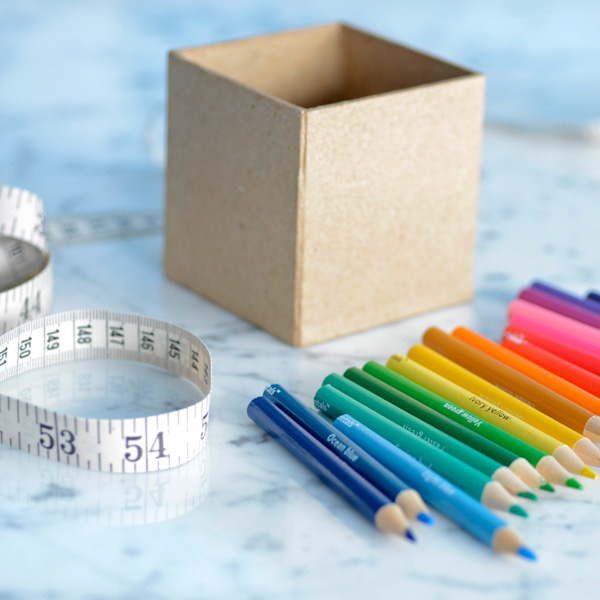
This excitement for the show inspired me to host my own “Make Things, Not War!” dinner party for a few of my craftiest friends, complete with how-to-kits that I assembled for each guest so they could create their own take-home favor boxes using little more than a handful of colored pencils and snippets of a measuring tape. So sharpen your pencils and your craft skills to get started on this weeks project!

What you'll need:

  • Small cardboard box
  • Colored pencils
  • Acrylic paint and brush
  • Measuring tape
  • Hot gue glun and glue sticks
  • Craft knife
  • Scissors

Step 1: Painting the box

Coat the inside and outside of your box with acrylic paint. I used white, but you can pick any color you want your box to be on the inside. The paint acts as a primer on the outside but should not show through the pencils when you're finished.
DIY colored pencil favor boxes

Step 2: Sizing your pencils

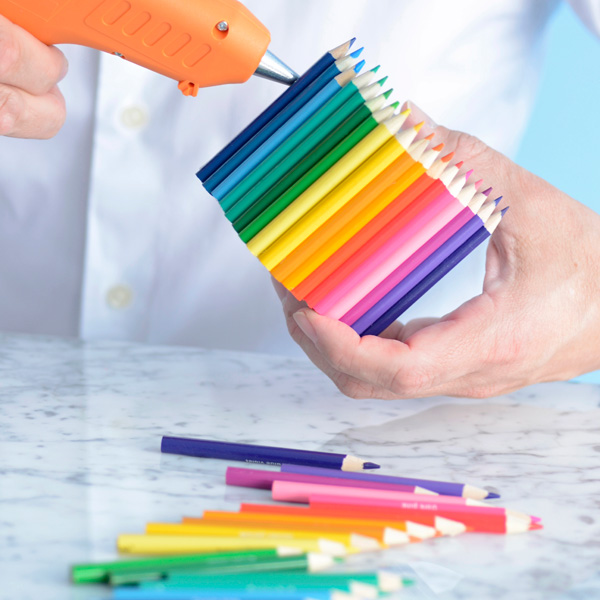
Gather a selection of colored pencils and trim them to the height desired for the sides of your box. I used standard-size colored pencils from Michael's Craft Store, cut them exactly in half using a craft knife and sharpened the ends.
DIY colored pencil favor boxes

Step 3: Attaching the pencils

Hot glue the pencils onto the box starting at the front and continuing all the way around. Use any color pattern you like!
DIY colored pencil favor boxes

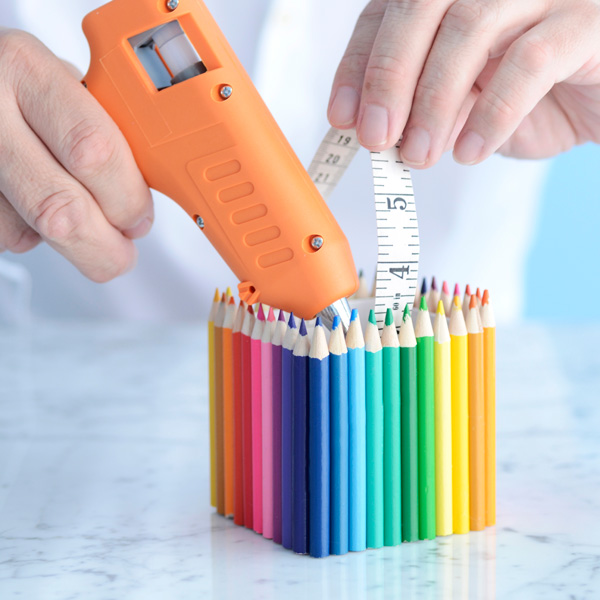
Step 4: Add the handle

Cut the desired length needed for making your handle from a standard measuring tape used for sewing and hot glue the ends to the inside of the favor box.
Fill the box with candy or trinkets and repeat the process for every guest... or share the fun and have them make their own!

Beautiful Frame-Craft ideas

FRAMED FOR THE SEASON!

Photos aren’t the only reason to use frames! This wreath is as pretty as a picture, made with a frame as its base.
Spring frame wreath
You can make decorating for the spring and Easter season a little more fun by making a DIY picture frame wreath. All you need are a handful of supplies to put together a festive, seasonal hanging wreath.Inspired by the CSI Project.

Supplies:

  • 8 x 10-inch wooden, decorative picture frame, backing and glass removed.
  • 8-10 very small nails (the size used to hang small photos to a wall)
  • 9.5 x 9.5-inch square of plastic grass
  • Decorative floral picks, and/or other seasonal sprigs like butterflies or colored eggs
  • Small hammer
  • Scissors
  • Wire cutters
  • Newspaper to cover your work surface
  • Wreath hanger

Instructions:

1
Supplies
Lay the newspaper on your work surface. Place the picture frame, face down, and carefully remove the cardboard backing and the glass. Recycle or save for another project.
2
Lay grass on frame
Turn the picture frame over so the front is facing up. Lay the plastic grass square over the top of the frame, right side down. Determine the amount that you will cut out from the middle of the square to form a frame with the grass. The grass frame will fit in the inside (around the inner edges) of the picture frame. Plan to cut away just several inches. Use your scissors to cut out the middle of the plastic square.
3
Turn over frame
Once you have your grass frame ready, lay it right side up, on top of the frame. Mark the spots where you will insert the small nails into the picture frame. The nails will be used to hang the plastic grass, as the square should have several areas on its base where it can hang from.
4
Hammer small nails
Carefully hammer the small nails into the picture frame. Plan to use three at the top and three at the bottom, and two on each side. Hang the grass square on the small nails. Tuck in any exposed edges of the grass frame.
5
Use wire cutters
Make sure the grass is securely on the frame. Use the wire cutters to trim down your floral or decorative picks, as needed, then insert them into the grass. Tuck the back of the picks behind the grass so they’re not visible.
6
Completed craft
Place your wreath hanger on a door, and hang the picture frame on the hanger.
Note: This wreath is best for hanging indoors. Hang it outdoors during good weather, and bring it inside during inclement weather.
This wreath is as pretty as a picture!